Slow Cooked Sweet and Sour Pork


Slow cooked sweet and sour pork
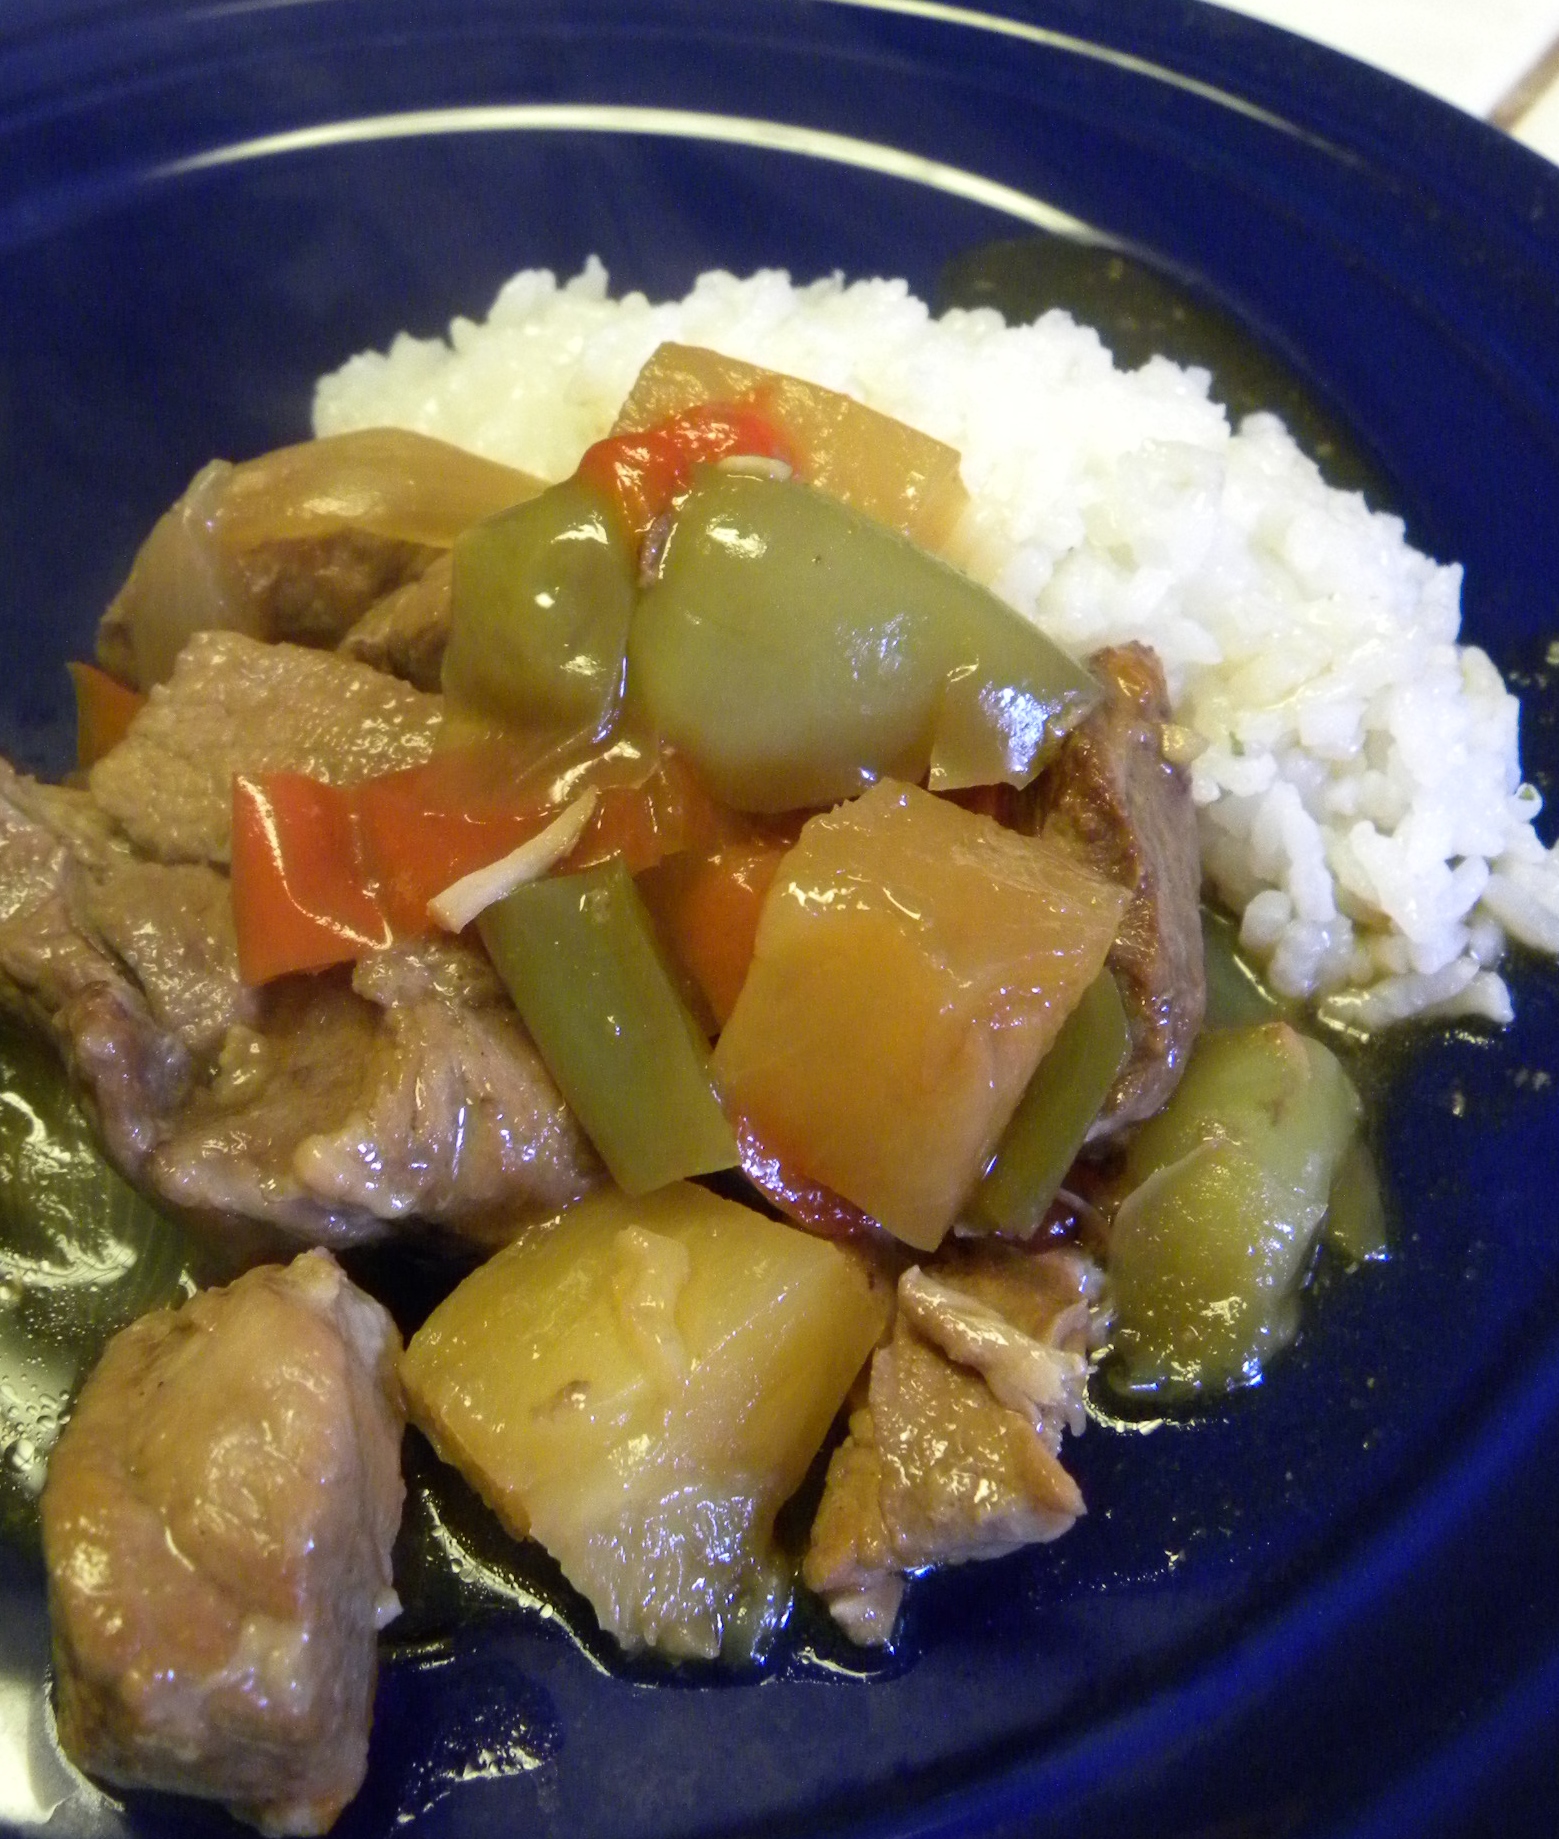
The slow cooker is a great tool for making crazy-free meals. Slow Cooker Sweet and Sour Pork requires minimal prep, a bit of cooking, then the slow cooker does the rest. This dish was a hit for the whole family. I converted the original recipe to Gluten-Free and changed it up a bit. The result was successful. The meat is tender, the flavors are savory yet not syrupy-sweet. To give the dish a little kick offer hot sauce on the side.

Slow Cooked Sweet and Sour Pork – Gluten-Free

Needed: Slow Cooker and cooked rice

2 lbs of Pork Meat – We used boneless Country Pork Ribs
sea salt and fresh ground pepper
Canola oil
1 whole onion
1 red bell pepper
1 green bell pepper
1 can pineapple chunks
1/4 cup apple cider vinegar
1/8 cup rice vinegar
1/4 cup ketchup
1/4 cup gluten free soy sauce
2 Tbls cornstarch
3 garlic cloves, minced

Cut pork into bite-size pieces, sprinkle with salt and pepper, place in skillet with about 2 tablespoons of Canola oil. Cook to brown meat on all sides. Transfer and place meat in bottom of slow cooker.

Cut onion, and peppers into bite-size pieces. Place over pork in slow-cooker.

Open can of pineapple chunks and drain juice into a bowl. Spread pineapple chunks on top of peppers and onions. Add to the bowl the vinegars, ketchup, soy sauce, cornstarch and minced garlic. Mix well and pour mixture over all ingredients in slow cooker. Set cooker to high and cook for 4 – 5 hours.

Cook rice per package directions to have ready when slow cooker time has expired. Serve with a salad. Enjoy!

“It’s Alway’s A Hit” Salad and It’s Gluten-Free


This salad is always a hit at Potlucks. We celebrated Memorial Day with friends yesterday and brought this salad. It again was a hit. It’s sweet and tart, fruity and nutty, fresh and cheesey and Gluten-Free. It’s just yummy.

Memoria Day at the Cabin

Memorial Day BBQ at the Cabin


“It’s Always A Hit” Salad

Ingredients: Romaine lettuce, Granny Smith apples, sugar-coated toasted almonds and feta cheese with a homemade mustard vinaigrette dressing.

Sugar-coated toasted almonds:
2/3 cup of raw slivered almonds
6 tbls sugar

Place nuts and sugar in a heavy sauce pan. Put over medium-low heat. Stir frequently until the sugar begins to melt. Stir constantly as sugar melts and the nuts toast. Do not leave this unattended as the sugar can burn quickly. Once the sugar is all melted and the nuts are toasted and brought to a lovely brown color, pour them out onto foil and spread to cool.  Keep little and big fingers from grabbing the freshly made nuts because the nut mixture will be extremely hot! Set this aside while you make the rest of the salad.

Salad Makings:
2 stalks of heart of romaine lettuce washed and shook-out and then chopped
2 Granny Smith apples, chopped into bite-sized pieces
1 8oz carton of blue cheese crumbles

Salad Dressing:
1/3 cup apple cider vinegar
1/3 cup olive oil
1 tbl sugar
1 tbl Dijon mustard

Place all dressing ingredients in a baggie (for traveling) or bowl if serving on-site. Mix together.

Making up the Salad:
Place chopped lettuce in bowl, add the chopped apple pieces and either the whole or 1/2 (depending on how cheesey you like your salad) carton of blue cheese crumbles, and the sugar-coated and toasted almonds on top. Dress salad just before serving. If traveling with your salad add the nuts just before dressing and dress salad at destination. The apples can also be cut on-site or add lemon to them to keep from turning brown. Mix salad together and watch people devour and exclaim how tasty it is!


How to cook meat on a gluten-grill with others:

Keeping our meat separate from a gluten area.

Bread has been and was going to be cooked on this permanent grill. We kept our meat separate from a Gluten-Area by putting our meat on a removable round grill placed on top of the permanent grill. That round grill would not have bread cooked on it. We can keep that removable single part of the grill clean (washed with soap and water) for use in the future too.

Food For A Crowd: Baked Potato Bar

Potato Bar

Last week we hosted our final weekly meeting for many here at our house.  I needed it to be pretty simple so we did a baked potato bar. This choice allows everyone to decorate his or her baked potato with toppings of their choice. I baked 24 russet potatoes in a 375 degree oven for a little over an hour. I opened cans of black beans, Chicken Chili and Beef Chili – both types are gluten-free (Trader Joe’s was my source for those) – and warmed them on the stove. Additional toppings were butter, salsa, sour cream and shredded cheddar cheese. A delicious salad and dessert were brought to our meeting by another gluten-free fan. Super easy, pretty cheap (the potatoes were on sale for $1.00/5 lbs) and satisfying for everyone. When everyone had their fill, we had some potatoes left over to enjoy at another meal.


Apple, Cranberry and Cashew Salad with Blue Cheese Dressing

Prepared, bottled salad dressings can pose a problem for the Gluten-Free eater. Many have wheat ingredients, or barley malt extract, or soy sauce, or Hydrolyzed Vegetable Protein all unable to be consumed by a Celiac sufferer. So when a very tasty, gluten-free prepared, bottled dressing is discovered we relish it!

Litehouse Blue Cheese Dressing is one of those to be relished. We use it to make one of our favorite salads: Apple, Cranberry and Cashew Salad with Blue Cheese Dressing. My daughter recently made this salad when we had 11 family members for dinner. Our Aunt called us a week later to ask for the recipe as she enjoyed it so much. So here is the recipe:

Apple, Cranberry and Cashew Salad with Blue Cheese Dressing

1 Stalk of Heart of Romain Lettuce
1 or 2 green apples
1/2 cup dried cranberries
1/2 cup low-salt cashew pieces
Litehouse Blue Cheese Dressing

Rinse the lettuce and chop into bite-sized pieces, place in salad bowl. Wash apples and cut into bite-sized pieces and place in salad bowl. Top with dried cranberries and cashew pieces drizzle with Blue Cheese dressing. Toss and enjoy.

Simply the Best Gluten-Free Lemon Bars

Image


I was known for my Lemon Bars . . . So, I pondered, “How can I make them gluten-free and really yummy?”

Flour was an ingredient in both the crust and the filling so this recipe was a challenge to reproduce gluten-free. After several attempts the Lemon Bars are back on the list of “Foods to be Remembered For.” To make them extra special top them with fresh berries and creme fraiche. Enjoy!

Here is the recipe for Simply the Best Gluten-free Lemon Bars:

What you will need: 9×12 or 8.5 x 13 ” glass baking pan, food processor – this is crucial to the optimal blending of the ingredients, especially for the crust.

Preheat oven to 350 degrees

Crust:

1/2 pound of frozen, unsalted butter cut into smaller chunks
2 cups gluten-free flour with xanthan gum (I use Better Batter)
1/4 tsp salt
1/2 cup sugar

Blend all crust ingredients in a food processor using the cutting blade until well blended and the consistency of coarse cornmeal. Pour into baking pan and smooth out over pan evenly.

Bake in oven for 30 mins. While the crust is baking, prepare the ingredients for the lemon filling by combining all dry ingredients in a container with a pour spout and measuring out the lemon juice. Combine the filling ingredients in the food processor in the last 5 mins of the crust baking.

Lemon Filling:

4 eggs
2 cups sugar
4 tbls corn starch
1/2 tsp baking powder
7 tbls lemon juice -fresh or from a bottle
1 tsp grated lemon rind

Combine all dry ingredients together in one container that has a pour spout. Beat eggs in food processor using the cutting blade until they are light in color and thick in the food processor bowl. Gradually beat in all dry ingredients. Add lemon juice while processor is still beating all ingredients. Stop processor when ingredients are well-blended. Remove crust from oven when time is up. Pour filling evenly over top of cooked crust. Return to oven and bake 30 mins. When done, filling top should be browned and it should be set.

Let cool in pan.

Once cool, dust with a layer of powdered sugar. Cut into squares, top with creme fraiche and berries. Enjoy.

Cooking Risotto – Gluten-Free People Have All the Fun!

DSCN9002Gluten-Free People have all the fun! How?

You say, “We have “limited” food options” how is that fun?

Eating Gluten-Free sets you on a culinary adventure to find options for the foods you can’t eat. One of the side options we have found and thoroughly enjoy is Risotto. We had Risotto, peas and chicken cooked in wine last night for dinner. I put my Gluten-Free son on the task of making the Risotto and he did a great job. It is labor intensive but so worth the effort.

How To Cook Risotto – serves 6 – prep time: 10 mins, cook time: 45 mins.

Ingredients:
3 Tablespoons Olive Oil
1 small onion, diced
1 1/2 cups Arborio rice
3/4 cup dry white wine (Marsala makes a great choice)
4 1/2 cups reduced-sodium chicken broth warmed
3/4 cups grated Parmesan Cheese
2 Tablespoons butter

Directions:
1. Get all ingredients measured, diced or shredded and ready to go. The broth should be in a container that pours easily (like a measuring cup with a spout)
2. Heat oil over medium heat and saute the onion until tender, about 5 mins. Add the rice and cook for 1 -2 mins stirring to coat. Add the wine, cook stirring until liquid is absorbed, about 1 min. Season with salt.
3. Add warmed broth one cup at a time to mixture and stir frequently until absorbed then add another cup of broth and repeat until all broth has been added and absorbed, about 25 mins. Yes your arm might get tired from stirring, but keep at it until the rice is tender but not mushy and suspended in liquid with the consistency of heavy cream.
4. Remove from heat. Stir in the Parmesan cheese and butter. Season with salt and pepper. Serve immediately. Risotto will continue to thicken as it sits.

Cooking the Chicken
1. Sprinkle sea salt and pepper on chicken tenders.
2. Brown chicken tenders in olive oil over medium-high
3. Add 1/2 cup dry white wine (I used Dry Sherry)
4. Cook over medium heat until cooked through (about 20 mins). Warning – do not cover chicken with the wine until the alcohol has burned off. Otherwise, when you take the lid off flames will erupt from the pan. Yup learned that one from experience.

Serve with the Risotto and peas. Eating recommendation: Put a bit of everything on your fork, the Risotto compliments the chicken and the peas most deliciously.

First Gluten-Free Christmas a Success!

“You have made Gluten-Free eating really tasty!” said my husband at the end of our meal. As I thought about what to serve on Christmas I realized that my tried-and-true Christmas dinner of salmon packets was gluten-free so I didn’t have to come up with a different main course. http://www.marthastewart.com/318922/salmon-spinach-and-potatoes-baked-in-par . The only thing I changed this year was to cook the potatoes just a bit before adding to packets. Turned out to be a good plan as the potatoes were nice and soft. While the packets were cooking I served up the salad as a first course.

So how about that salad . ..  hmm something Red and Green for Christmas. Yes. Came across the Barefoot Contessa’s balsamic roasted beet salad. Perfect. The only change I would make is to decrease the salt by 1 tsp and add 1 tsp of sugar instead. Here is a link http://www.foodnetwork.com/recipes/ina-garten/balsamic-roasted-beet-salad-recipe/index.html. 

So now onto dessert. This is the trickiest part of planning a Gluten-free meal. Trader Joe’s makes these really tasty GF Ginger Snaps that we used for the basis of a pumpkin pie crust for Thanksgiving. So how about for a cheese cake? Yes, it would work. Then add some caramel. Mmmm. So I found this recipe and adapted the crust to be gluten-free using Trader Joe’s GF Ginger Snaps: http://www.tarteletteblog.com/2007/03/pillow-cheesecake-with-salted-butter_17.html?m=0

I  actually have two spring-foam pans in two sizes that would take the whole cheesecake recipe. So I made the larger one according to the crust in the recipe which was NOT Gluten-free. The smaller pan crust used Trader Joes’s GF Ginger Snaps crushed, salted butter, and some sugar. I combined all the ingredients and pressed it into the bottom of the smaller spring-foam pan and baked it along side the other crust.

Image

To top it all off I cooked pear slices in butter and a bit of brown sugar with a pinch of salt and put the pear slices on top of the cheesecake slices and topped each slice with the home-made caramel sauce. Oh SO delicious! Rave reviews by all!

Quick, Easy, Loved-by-all Fajitas!

Last night we all enjoyed Fajitas. This has become one of our easy “go-to” dinners that is really quick to make and everyone loves them. Our non-gluten people can choose either corn tortillas or corn taco shells. Our gluten people can choose flour tortillas or the corn-based options. The hardest part is getting all the sides ready!

Fajitas

Need: 2 iron skillets

1 package of stir-fry beef pre-cut into strips
seasoning of choice (taco or chili or salt + pepper)
1 red bell pepper (or color of choice)
1 medium-size onion
olive oil
corn tortillas
corn taco shells
flour tortillas (for the gluten-eating folks)
shredded lettuce
shredded cheddar cheese
sour cream
1 can black beans
salsa
lime, cut into wedges
avocados – smash green flesh to make guacamole; add lime juice, garlic salt, white pepper and cumin
cilantro, rinsed and chopped

Directions

Heat a splash of oil in each iron skillet over medium heat. Season the meat. Cut up the bell pepper and onion into strips and season. Place meat in one skillet and vegetables in the other. You can put all in one skillet, mine just aren’t big enough to cook all the items at once. Turn up heat and turn items over in pan to coat with oil. Meanwhile prepare the guacamole and get other items out.

When meat is cooked and veggies are tender turn off heat and call family to build their own fajitas.

Here is a suggested order of item placement in fajita. Meat, cooked veggies, beans, cheese, sour cream, guacamole, lettuce, salsa, cilantro lime.

Enjoy!!

Roasted Chicken, Potatoes and Veggies Yum!

Roasted Chicken, Potatoes and Veggies – Gluten-Free

Needed: 1 roasting pan and 1 chicken roasting rack

Ingredients
1 roasting chicken 4 – 6 lbs
1 stick of salted butter – softened
1 lemon
dried rosemary
handful or two of baby carrots
1 bag of fingerling potatoes or 4-5 larger potatoes cut into fingers (Yukon Gold is preferred). Amount depends on how much room you have in your roasting pan. You can always add more or less.
1 medium to large onion
1 large red bell pepper
salt and pepper

Directions:                                                                              Oven 375 degrees
Start oven at 375 degrees. Place roasting rack in roasting pan. Unwrap chicken and remove any giblets (I place these in a pan and cover with water then boil, cool, then cut giblets into pieces and save mixture to feed to dog with her dinner). Rinse chicken in water and dry with paper towel then place breast-side up on top of rack in roasting pan tucking wing tips under the breast.

Using a spoon, detach skin from chicken without breaking the skin (insert spoon under skin at base of breast and gently move it over breast and over tops of legs to detach the skin – see picture). Meanwhile soften butter in microwave if not softened already.

Cut lemon in half. Using both halves, squeeze lemon juice down chicken breast under the skin on both sides. Rub lemon over the top of the skin. Place one squeezed half of lemon in chicken cavity. Cut other lemon half into 8-10 pieces and place pieces in roasting pan under the chicken.

Place globs of butter under skin and on top of chicken breast and thighs using about 1/2  of the butter stick. Rub some butter over the top of the skin all over. Remaining butter will be used for potatoes and veggies.

Sprinkle dried Rosemary over whole chicken.

Place a handful or two of baby carrots under chicken. You can use more; my kids do not care for cooked carrots so I don’t use too many. I love them as they come out so yummy with the lemon and onions and bell pepper cooking with them. They add flavor to everything too.

Place potatoes in roasting pan under and around chicken. Smear the rest of the butter over all the potatoes.

Cut onion into narrow sections. Separate sections from each other and place onion pieces under and around chicken and potatoes.

Cut red bell pepper into narrow sections. Place sections under and around chicken and potatoes and onions.

Sprinkle the whole chicken, potatoes and veggies with sea salt and fresh ground black pepper.

Place in pre-heated 375 degree oven for 1.5 -2 hrs. If skin begins to turn too brown in areas where butter congregated then cover top of chicken loosely with foil for the last 1/2 hr of cooking or so. Chicken is done when leg can be moved easily and feels loose.

To serve:  Cut up and carve chicken and serve alongside the cooked potatoes and veggies. Be sure to spoon the roasting pan juices over the chicken and veggies when serving. The roasting pan juices are the best part! Enjoy!

What to do about using flour?

“I’m going to send you some Gluten-Free flour that we have discovered.” exclaimed my very-supportive sister-in-law who ventured down this path over a year ago for her daughter.

Soon a box of Better Batter flour arrived at our house. One of the first things I made was bread. Yes bread. Yeast-challenged as I am I did make bread, but that story is for later. The great thing about Better Batter is that the folks who make it mix all the gluten-free flour types up for you and add the xanthan gum (the gluten replacement). So many gluten-free recipes call for different measures of like ten different flours (CRAZY) then ask you to add the xanthan gum (EXPENSIVE). So this mix (Rice flour, brown rice flour, tapioca starch, potato starch, potato flour, xanthan gum, and pectin a lemon derivative) is already made up for you.

In my experience with it, I have discovered that adding a little more BUTTER (thank you Julia Childs and the movie Julie/Julia) just smooths out the graininess. I use it to thicken soups, in the cheese sauce for chicken enchiladas, and have baked bread and cookies with it. I substitute it cup-for-cup or tablespoon-for-tablespoon and when possible just add more real BUTTER. Yum.